måndag 18 maj 2015

Buttons and frills

I bought a lovely lightweight wool fabric some years ago, one in a mustardy yellow and one in dark cherry red, both with a certain dress in mind. The yellow dress is now done and it was frequently used during the past week at Double Wars.

The model is based primarily on the dress shown in this little drawing by Martin Schongauer, depicting a young girl fanning a fire with a bird´s wing:

The dress looks fairly simple in cut, not fitted in the bodice but simply gathered by the belt in the waist and the lovely detail with a side-buttoned neck-opening. On the skirt a large frill shows, most likely a way of preserving some of the length to be used for a new bottom hem as the old one gets worn. These kind of frills can be seen on simpler kirtles during the 15th Century. 
Master of the Housebook, Children of Aristotle, detail

Master of the Housebook, Princess Kleodeline
I have not found many depictions showing a woman´s kirtle with a closure to one side but here is one that looks pinned.
Israel van Meckenem, Couple seated on a bed
I chose to cut my dress in four panels, and had to make a good mock-up before I found a satisfactory solution for the fastening. I was also a bit concerned over the frill, since the panels are more A-line than straight, but it worked better than I had hoped. For buttons I used some pewter buttons in the shape of acorns that I got as a gift for my fourtieth birthday. Yes, I love acorns. The dress is not lined other than along the neckline and top front to strengthen the buttoned part, and here I used an even finer wool in green. This dress will get used a lot, since it is easy to pull over a kirtle and use as a thin extra layer or as a simple dress to wear with ease when not feeling like getting into something tight and fitted.

The hat deserves a chapter of its own, I will see when I might get to that. 

söndag 12 april 2015

To hide the mundane

When playing the game that is SCA we strive for things to look and appear medieval, some of us aim for as much authenticity as possible. But sometimes I am truly grateful that the SCA gives allowance for creativity as well and to makes some shortcuts. Especially when trying to get your kids involved.

My kids really like their waterbottles and want to bring them with them. So I started with some nice embroidery for some bottlebags:

http://www.renikasanachronisticadventures.blogspot.se/2015/02/doodeling-with-needle-and-thread.html

Soon after finishing that post I was done with the embroidery for the eldest son:
And since he was coming with me for a crafts-event this weekend I finally got around to actually making a bag out of it. During the event I also finished his brothers bag. I am sure they will be put to good use!

tisdag 3 februari 2015

Doodeling with needle and thread

I truly suck at drawing, it just never turns out the way I imagine it. With a pen on a paper that is. But give me a needle and thread and the doodles just comes to me. I can look at an image and then make my own interpretation of it and I love this process. On the other hand I cannot for the life of me follow a line properly when filling it in with embroidery, my fingers just follow their own mind. Hence, counted embroidery is my big nemesis. I love the look, the symmetry, the patterns, but my fingers do not.

The project of making a bag for the youngest son, to keep his waterbottle and such in at events, was a challenge until I decided to go for free embroidery instead of a counted border. My main inspiration for doodle embroidery is this wonderful shirt/shift from the 17th C:
With this in mind I searched for animals to draw on a square piece of linen hemp, and then I draw some outlines in pencil. Then I embroidered one little animal per night, using a dark ambercoloured silk and using stemstitch for the outlines and stabstitch for effect. This is the result:
The only animal I haven´t found an example of in period art, embroidery or manuscript illuminations was the polar bear, but the youngling insisted on having one since it is his favourite animal. They were of course known in period and friendly people have pointed out that there even was one living in the court of Henry III and it was allowed to swim in the river Thames to catch fish. 

Now my next project is a similar piece for the eldest son, who has decided on having only flying animals on his. So far I have drawn a collection of birds, a fly, a dragonfly, a butterfly and of course a bat and a dragon. This is so much fun spending my nights doodeling in front of the telly.

måndag 26 januari 2015

Embroidery madness strikes!

This New Year´s I stepped up as Guild Head of the Dragon´s needle embroidery Guild, and started a Facebook-group for us so that we can share projects, ideas, tips and tricks and inspire eachother. Well, it for sure seems to do the trick on my behalf. That, and getting to visit Petronilla in Germany and looking through some awesome books, museums and such.

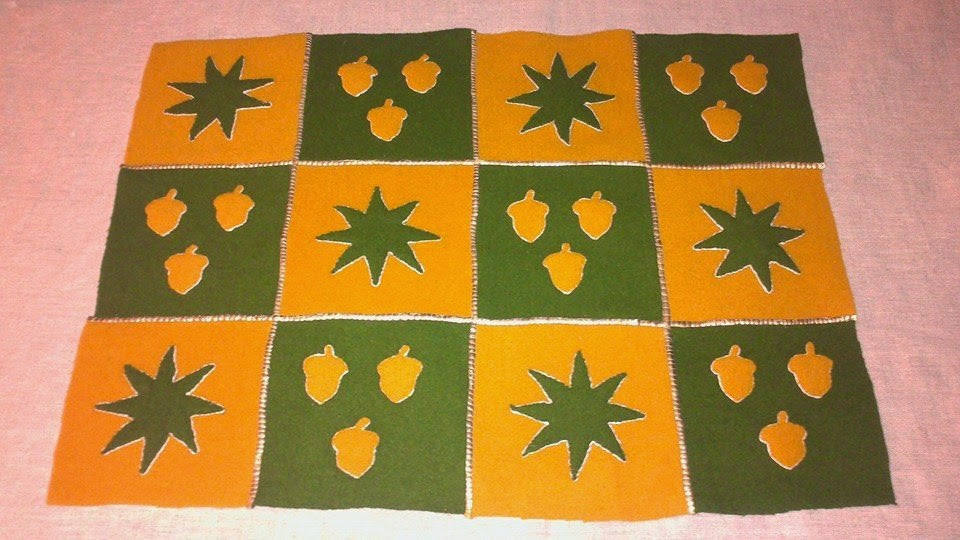
I have embroidered like mad since I got home! And mostly for myself (and the family). The first project is going to be a cushion for me, with the elements of my heraldic arms (within the SCA that is), the green sun on golden background and the three golden acorns on green background. I wanted to try some appliqué and had some very nice wool at home, meant initially for a miparti-dress that never happened (the wool is a bit too heavy for a dress). First I cut all the pieces, using small paper patterns for the sun and acorns. Then I stitched all the pieces onto the ground fabric with thin linen thread and then finished it with strengthening edging in thicker linen thread in white, as can be seen in some period examples. When all the patches were done, they were pressed with a hot iron with a damp cloth inbetween, and they shaped beautifully.
Then it was assembly time, I sew the patches together with overcast stitches, small ones, they were folded out and pressed again and then on to the next patches. This was also done with the thin linen thread. And it was a very neat little project to bring with me while traveling, so my fellow train passengers looked a little puzzled for a while. No one dared ask me what I was making though, sadly. I have been getting into really interesting discussions with other travelers on other occasions, both on the long ferry rides to the mainland and on boring trainrides across the mainland.

As all the patches were assembled I started cutting thin strips of the gilded leather in order to cover the seams. And since the leather is rather stretchy you do not need to cut it in straight lines, you can follow the natural curve of the hide and it will still shape nicely when stitched down.
The leather strips were sewn down with a rather tight overcast stitch with linen thread covering the seams. Now I just need to cut some backing and make it all into that soft and pretty little cushion to
sit on. I am pondering either a nice leather so it will stand some wear, or a nice wool. 

Done with that I moved on to try something completely different, the freehand blackwork (or in this case dark green...). Immensly inspired by a post by a very talented member in the Historic Hand Embroidery group I decided to stitch a little owl for the eldest son. He asks for a sewing kit of his own for his upcoming eight birthday and I wanted to make a pincushion. He loves owls, specifically Harry Potter´s owl, so the motif came naturally. This is made in stemstitch in silk on linen and I drew the little critter free hand.
  

For the back I took some leftover green wool from my heraldic project and stitched it together and then I covered the seams with some reversed chain stitch in bright yellow silk. I hope he will like it!

And this technique was so much fun that I decided to fulfill my promise to the youngest son and make him a linen bag for his water bottle, so that I will allow him to bring it to events. One has to give them something to keep it all fun and interesting. And for this project I even tried my centereyed embroidery needles and it works beautifully! More updates to come when this is all done.

tisdag 6 januari 2015

Kruselers - sewn or woven?

There are so many kruselers out there, differing in looks and most likely also in technique. Following up on my last blogpost here comes some thoughts on construction of the less elaborate kruselers, mostly seen in 15th Century art. Some say they must all be woven frilled edges. However, there seems to be exceptions.
Mary from "The Deposition" by Rogier van der Weyden, 1435.
Here we see a clear example of what must be a woven frilled edge and it is looking the same through most of Rogier van der Weyden's art. This is obviously an expensive and exclusive fabric, woven by professionals, and you can find it recreated today, but it is costly. Just how exclusive it was can be shown also in the fact that Jesus loin cloth is depicted as frilled, from the time he was wrapped as a baby until his death.
Epitaph for Konrad Winkler and his wives Kundigunde and Adelhaid, Nürnberg 1431.
The same simple frill can also be used in more elaborate styles by simply using it in multiple layers.
Portrait of Giovanni Arnolfini and his Wife (detail) 1434 by Jan van Eyck
Detail from St. John Altarpiece by Rogier van der Weyden, 1455 - 1460
The same frilled fabric also seems to be in use in the German styles of late 15th Century, pressing on to the fashions of 16th Century. Here we see one of many examples where it is combined with a vulst.
Portrait of a woman from the Hofer Family, artist unknown, ca 1470
Frills are also in use in Burgundy, England and France, although adapted to the local headdress fashion. 
Portrait of Mary of Burgundy wearing a small frill under her hennin.
Portrait of a young woman, possibly Anne de Dreux, ca 1490.
And by now you are starting to wonder if I will ever get to the point. Where there possibly exceptions from the woven frill in plain single rows? I did find some beautiful frills that do give the impression of having a seam connecting it to the veil, even though it is a single frill when visiting the Germanisches National Museum in Nürnberg on New Years. And they are from the 14th Century, not the 15th. 
Mary, from Frauenkirche in Nürnberg, ca 1360

Female statue from a church in Nürnberg ca 1360.
And in case you now are wondering the artform might have an impact on how the frills are depicted, here is another one in stone, clearly without the line that I would like to interpret as a seam. Same church and same period as the first one.
Statue from the south portal av the Frauenkirche in Nürnberg, ca 1360.

So one can not state, in my opinion, that frills were only woven when done in single rows and simpler styles. Good to know, now I will not have to spend like half a month´s salary on a frilled veil, I can make one myself. Even though I really really like one that is woven.


söndag 28 december 2014

Two kruseler or frilled veils


Having had a hectic Autumn at work nothing much has been done, or so I thought. But being forced to go through all my pics and decide what to keep I noticed that there has been some sewing after all.

Here comes a brief show of two kruselers I made for others, one is sewn in small pipes and then starched, the other one is a softer look with lots and lots of neatly hemmed linnen strips, gathered and the secured.


First, cutting. In order to get a very straight, on the grain-cut, I first pull out threads in the linnen weave and then cut along the line.


When it is all cut I press them, preferably with a little spray starch, makes it easier to fold when hemming. Then comes hours after hours of hemming teeny tiny hems. The strips for the gathered kruseler are hemmed on both sides, then folded alongside the middle and gathered with two rows of parallell gather stitches. Then a small strip is sewn on and attached around the gathering creases to hold it all in place. This gives you a rather sturdy kruseler that can be sewn or simply pinned onto your veil.


The other veil demands a bit more measuring but does not need that long strips. I made the pipes 1 cm wide, then they will be filled out fine with an ordinary earplug to create the round shape when drying after being drenched in starch.


Both recipients were happy but I have not yet seen them properly worn, but I hope to see them come spring.


lördag 19 juli 2014

Summer greens

I have for a number of years had a large pile of a wonderful thin but tight woven wool fabric with an amazing drape to it. It was bought without a specific plan and over the years I have made so many different plans for it but none were realised.

Since I started focusing on my main period of garb, the German late 15th Century, and managed to make my own interpretation of the pleated panel kirtle (Hausbook, Dürer kleid, Nürnberger kleid or whatever you choose to call it) my research also showed me variations of a deep V-neck kirtle without pleated panels. I thought that would work fine as more of an everyday dress and decided to make one out of this greyish green fabric that had been laying on a cupboard shelf for years.

I looked into some more period depictions and decided on a very simple version with plain long sleeves with the same shoulder- and back as my brown shortsleeved kirtle, and with a frontlacing going over the V-neckline. The two green ones shown here are both taken from a larger piece depicting a tourney with audience by Master of the Hausbook. So, not all dresses depicted by him are what we tend to call Hausbook dress. They are both rather simple, with a plain long sleeve and a marked waistline and the deep V-neckline I find so appealing. And to my great joy I noted the wonderful diversion of headgear in this the very same picture.


 This drawing is by another master of the same period and region, Ishrael van Meckenem, and shows a woman with a really deep V-neck, laced across inbetween what looks like some kind of clasps. The sleeves are a bit more elaborate though.

Here is yet another depiction by another artist, showing the V-neck.
And here is a rather nice pic of the back, showing the deep inserts of the sleeves.

I started with the bodice and cut it with a white linen lining, stitched it and then I cut the skirtpart in four panels, sewed them together and then attached the skirt to the bodice, not taking enough care to adjust the length of the bodice. That turned out really bad, more on that later. Last I assembled the sleeves, rather tight and with one large gusset over the shoulder. Here is a rather bad pic showing it all sewn together.
As you can see when looking closer, the skirt does not fall well below the waist, it kind of crumbles and makes creases, and the bodice itself is all wrinkled along the sides. When wearing it the shoulder seams move upwards together with the entire bodice and it felt all wrong. Almost in despair I asked: can I live with this or will it agonize me forever? At last I decided that it just doesn´t work and simply cut it loose above the waist and ended with shortening the bodice approximately three centimetres. It really did the trick I tell you! And I should know better...

All done it got worn properly assecorized today and documented on the first spin. And look how much happier I am with a properly placed waistseam!